

The Istio Rabbithole
Istio can be overwhelmingly complex but using the istio operator, helmfile, and local kubernetes in docker clusters, we can simplify the learning journey.
Introduction
I’ve been meaning to dive into Istio for a while now. In a way, it was a purposeful delay of gratification as I knew Istio would be a riotously good learning experience that would be worth spending some time on. Recently I found a reason to install it and was able to vet out some of what it can do. And now that I have, I’m glad I waited for the Istio hype-dust to settle. The recent efforts in the project to simplify its complexity via an operator has definitely worked out in my favor.
In this article I’ll go over what I used to plumb the depths of Istio (ok, lets be honest, skim the surface). This article is more about the layout of tooling and framework I created to rapidly vet out new technologies on Kubernetes locally and how you can use it in your own learning journey.
Setting Profiles
Before starting, I ran into my first real conundrum, which Kubernetes distribution should I use for local testing? As a docker runtime will be the common element across most testing environments I’ll be using (Ubuntu, WSL, OSX) I quickly determined that Kubernetes on docker was to be used. Towards this end, I wanted to use either k3d (k3s in docker) or kind (kubernetes in docker). Both are fast, have strong communities, and quite simply rock. And because I want it all, I created a project to use either at will. I call this little scaffolding project CICDHelper as it is meant to be a starting point for developing solutions locally before transposing them to a CICD pipeline.
So I broke down the tasks for using k3d or kind into generic commands sourced from individual Makefiles that get loaded based on a single top level profile. The top level profile gets loaded by a single environment variable called PROFILE. I originally was also going to include minikube, libvirt, and vagrant, but it felt like overkill. This hacky plugin system would still allow me to do so if required though!
For istio testing we may use a profile of /config/istio.env with contents like the following to default to a kind-based cluster.
KUBE_PROVIDER=kind
KUBE_CLUSTER=cicd-istio
KUBE_VERSION=1.18.2
ENVIRONMENT=istio
ADDITIONAL_TASKSETS=istio
This tells us that;
- we are using a kind-based 1.18.2 Kubernetes cluster,
- with a name of cicd-istio,
- that uses the helmfile environment of istio and an additional custom taskset for istio specific operations.
NOTE I purposefully used istio as an example for this article as it is one of the more involved deployments and necessitated a custom taskset. The CICDHelper project started as a simple framework for gluing together various kinds of helm charts into helmfiles and deploying them rapidly to various environments. Most basic scenarios do not require custom tasksets at all.
# Set our working profile so we don't have to pass it to each make command manually
export PROFILE=istio

# Download any dependant binaries
make deps

# Start the cluster defined in our profile
make cluster/start
To ensure that your local kubectl profile is pointing to the newly created cluster update your current session’s KUBECONFIG env var. I also alias ‘kube’ to the locally downloaded kubectl binary.
export KUBECONFIG=`make kube/config/file`
alias kube=$(pwd)/.local/bin/kubectl
kube get ns
Deploying Istio
Istio can be deployed several different ways. I’ve opted to use istioctl to do the deployment of the operator that then consumes a declarative manifest for configuring the istio services (also known as profiles) as that seemed to be the most declarative and straightforward way to get this done. I made minor changes to the default profile to make the deployment more usable for the example bookinfo application and store it in ./deploy/istio/profile.yaml. The only real difference in my profile versus the demo profile is that I disabled the egress controller.
# Install istio operator via istioctl using the ISTIO_PROFILE of demo
make istio/deploy
Deploy Bookinfo
The bookinfo application is an example microservice to deploy into Istio. If you are just learning Istio then you should probably do this part manually and walk through one of the several learning exercises that Istio documentation provides.
What I’ve done is turned the deployment into a single command that uses this framework, helmfile, and the raw helm chart. This is the meat of what I initially set this little framework up to do anyway. Each helmfile can be a combination of several charts and even other helmfiles. As such I like to refer to what gets deployed simply as a STACK. In this case we will deploy the bookinfo stack.
# Deploy the bookinfo helmfile for the full deployment along with the gateway and virtualroutes it requires
make helmfile/sync STACK=bookinfo
If you want to deploy additional ingress for kiali:
make helmfile/sync STACK=istiodashboards
You can also quickly start up any dashboard istioctl can find via kubectl proxy. Kiali is the one most people like to look at and show off (use admin/admin to login):
make istio/dashboard/kiali
Very shortly, we will setup dns forwarding with istio ingress to remove the need for a proxy connection. But first lets address some technical difficulties around local ingress deployments.
Hurdle - The LoadBalancer
When setting up a bare metal Kubernetes cluster there are components that are lacking entirely from your typical cloud based deployments. One in particular is sorely missed, the LoadBalancer resource. Without a loadbalancer we are left with using kubectl proxy commands to access exposed services like peasants! To work around this k3d includes its own implementation of a software loadbalancer and works out of the box. For kind we end up simply deploying MetalLB to the clusters and have it use a range of IPs that should be available and bridged in most docker deployments (172.17.0.x). I’ve set it up so that metallb gets installed automatically when running the cluster/start operation when deploying a kind cluster.
NOTE kind will use the existing bridge docker network. k3s creates its own bridge network.
Hurdle - DNS
The loadbalancer allows us to access the cluster running in docker via IP address easily enough. But we also want to be able to test out real DNS queries and deployment of ingress in a manner which we can float up to a production level deployment in the future. In order to do this, we can manually modify hosts files on our workstations like button-mashers. Or, we can try to manipulate how DNS works on our workstation in craftier ways.
Many moons ago I once setup dnsmasq to forward to specific DNS servers based on the zone being queried and simply set my workstation to use dnsmasq so that I could administer multiple disparate forests at once. I started looking to do this again via a docker image instead and found another excellent project already out there for such DNS trickery called dns-proxy-server.
It is deceptively simple to use dns-proxy-server as it does not require you to make any system changes manually and suddenly, your resolution for custom domains will just ‘start working’. Behind the scenes there is a simple json configuration file that we can use to modify zone and record lookups and when we run the image we are also going to volume mount our resolve.conf file for it to modify so that lookups for our system first flow through the container.
Here is how you would enable this using CICDHelper.
# Start another pod to do dns forwarding of the url for this and the default domain (int.micro.svc) to your cluster loadbalancer
make istio/start/dnsforward
This little line actually does quite a bit. Firstly, we need to have some zone definition to forward requests to and for any future ingress definitions we wish to create. Because I’m a fan of helmfile, I put this in a helmfile environment definition yaml file. I store a parameterized template for dns-proxy-server in deploy/dnsproxy/config.json. This gets rendered via gomplate with the yaml environment file as a datasource and stored in a temporary directory before being volume mounted into the container.
This is all done with the following code.
.PHONY: istio/start/dnsforward
istio/start/dnsforward: istio/stop/dnsforward ## Forwards all dns requests to a local dns-proxy-server
	tmpdir=$$(mktemp -d) && echo "$${tmpdir}" && \
	export STACK_INGRESS_INTERNALIP=`$(kubecmd) -n istio-system get svc istio-ingressgateway -o jsonpath='{.status.loadBalancer.ingress[0].ip}'` && \
	$(gomplate) \
		-d config=$(CONFIG_PATH)/environment.$(ENVIRONMENT).yaml \
		--file $(DEPLOY_PATH)/dnsproxy/config.json \
		--out "$${tmpdir}/config.json" && \
	docker run --rm -d \
		--hostname $(STACK_INGRESS_INTERNALZONE) \
		--name dns-proxy-server \
		-p 5380:5380 \
		-v $${tmpdir}:/app/conf \
		-v /var/run/docker.sock:/var/run/docker.sock \
		-v /etc/resolv.conf:/etc/resolv.conf \
		defreitas/dns-proxy-server
	@echo ""
	@echo "STACK_INGRESS_INTERNALZONE=$(STACK_INGRESS_INTERNALZONE)"
	@echo "View dnsforwarding admin page at: http://localhost:5380"
I do this specifically in the istio taskset as retreiving the ingress IP is specific to the ingress deployment Istio creates. Were we to deploy some other ingress controller or do this in production I believe it would be wise to statically set the ingress loadbalancer IP upon creation instead of dynamically sourcing it like this. There is room for improvement here I suppose.
In any case, if you have started up the DNS proxy and now visit the default product page for bookinfo, http://bookinfo.int.micro.svc/productpage, it should render for you.
Additional Helmfiles
This is technically a fully working application. But if you want to see other dashboards (such as kiali) then more virtual routes need to be created to handle the requests. I’ve gone ahead and created another helmfile called ‘istiodashboards’ that publishes kiali specifically. It is nominal to setup additional virtual routes for prometheus or grafana as well, simply update the existing helmfile or create new one in the helmfile directory.
## Enable the kaili dashboard
make helmfile/sync STACK=istiodashboards
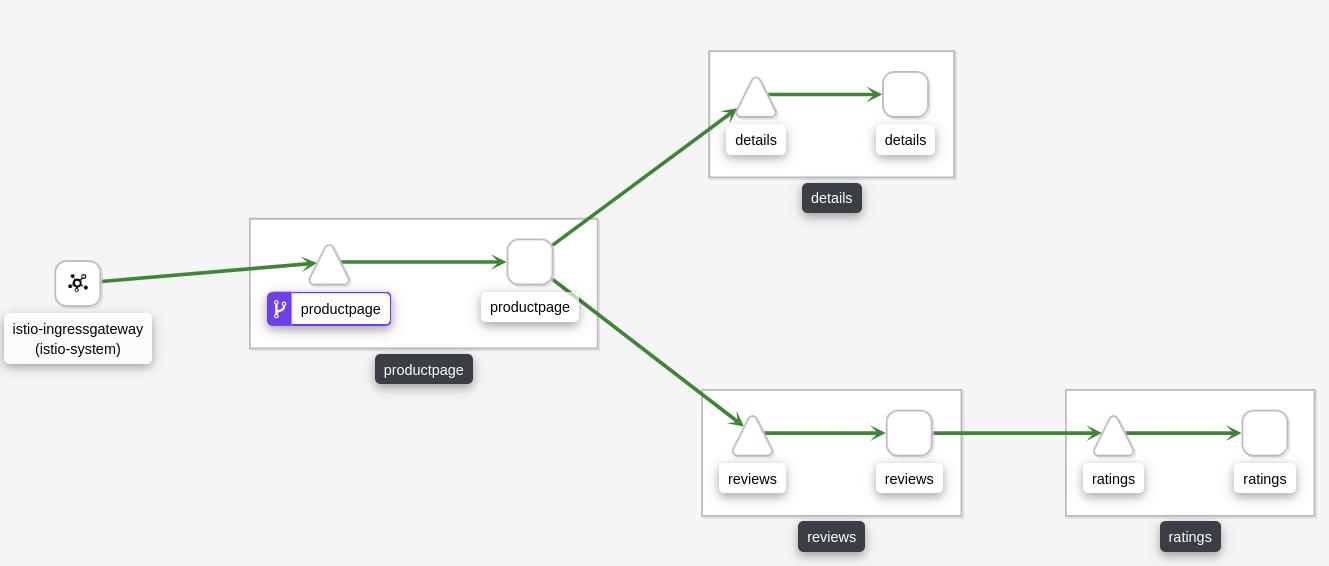
The bookinfo application in the kiali dashboard
## Disable it when you are done (as an example)
make helmfile/remove STACK=istiodashboards
Shutting It Down
This is the easiest part:
make cluster/stop istio/stop/dnsforward
unset PROFILE KUBECONFIG
Now Use k3d
Prefer k3d? Ok, using k3d instead of kind for the cluster is easy. I’ve already created the profile for it (./config/istio-k3d.env).
make deps cluster/start istio/deploy helmfile/sync istio/start/dnsforward STACK=bookinfo PROFILE=istio-k3d
make helmfile/sync STACK=istiodashboards PROFILE=istio-k3d
Conclusion
That was fun right? In the next article I’ll cover more in depth how we can turn that raw helm chart mess into a usable part of an archtype helm chart so that we can deploy and test multiple ingress controllers and expose resources using the same set of base definitions.
Just as I was finishing this article I ran across "Istio Succinctly" which dives into the various components of Istio. I highly recommend grabbing it and giving it a once over. Then with that knowledge and this little project, setting up additional components like citedel and galley for local testing will be a cake walk.
Here are some links in no particular order:
CICDHelper - My little abstraction framework
Istio Succinctly - An excellent free ebook on Istio
Gomplate - The king of devops file templating utilities
Helmfile - Like helm, only 10x better
dns-proxy-server - Intercept local dns resolution like a boss