
Exchange: Receive Connector Tango! – Part 1
Exchange receive connectors are often configured incorrectly or worse, insecurely. This is the first of a two part series about Exchange receive connectors and what to look out for when setting them up.
Introduction
This article has been sitting as a draft on my hard drive for months now. Two events have hastened the publication of this post; 1.) A receive connector issue I first encountered over two years ago has cropped up again for another client recently and, 2.) I almost lost my hard drive to a coffee spill incident caused by of one of my children. So I’m feeling a bit more compelled to get this posted.
A summary of what one might learn from these articles (probably the most important take away has been made bold for your convenience):
- In Exchange you should understand how mail flows before setting up new receive connectors. Creating a receive connector for mail bound outside of your organization with a frontend transport receive connector on a server may not result in that same server being the source for sending the email outside the organization.
- Internal relay receive connectors should always be setup with as narrow of scope as possible for allowed IP addresses. If you are performing an Exchange upgrade or adding a new transport server to an existing deployment you should validate that none of the manually created receive connectors contain IP address or scopes that overlap with your new servers’ IP addresses, default gateways, Load balancer VIPs, or anti-spam devices.
The original write up I did was far more narrow in scope. This write up has since morphed dramatically in several directions so please excuse the apparent lack of focus. I think you will find that it is all pertinent information for those who are interested though. I am keenly aware that this material can be rather dry so I’ve attempted to make things a bit more lively with an occasional Powershell script and illustration. If you have gotten this far and are still interested then please read on!
Understanding Receive Connectors
Understanding some very basic truisms about how a receive connector works is vital to the rest of this conversation. If you understand only four properties about Exchange receive connectors everything else will fall into place;
- Receive connectors are a per-server setting.
- The most precise RemoteIPRange determine which receive connector is chosen to route inbound email when multiple receive connectors are listening on the same IP and port.
- There is a difference in being authenticated to connect to a receive connector and having the rights to relay through it.
- Exchange 2013 has two types of receive connectors. Which kind you use is very important.
The first three points in this list generally apply to any receive connectors in all versions of Exchange 2007 and beyond. So lets cover the fourth item first as it is the only one which is Exchange 2013 specific and seems to be the least understood.
Receive Connectors in Exchange 2013
If you have been paying attention you will notice I’ve not once referenced a ‘CAS’ server. Many Exchange 2007/2010 environments employ CAS and transport roles in a collocated manner and admins tend to always refer to them as their ‘CAS servers’ when discussing hub/transport and client access roles. But it is generally understood that receive and send connectors are purely a transport server function. In fact there are some larger organizations which have even employed separate hub/transport servers in their Exchange 2010 designs. As you are likely aware, Exchange 2013 defines only two server roles (well 3 as of SP1 with the reintroduction of the edge server role), the CAS and the Mailbox roles.
In a multi-role Exchange 2013 deployment you actually run bits and pieces of the transport services across all the servers. Client access servers in Exchange 2013 simply proxy through SMTP messages without inspection or queuing to the transport services running on the back end mailbox servers. This proxying of SMTP services is aptly called ‘Frontend Transport’ and it deals with all email delivery not within the realm of the Exchange transport resiliency boundaries. You can specify multiple Frontend Transport receive connectors on a single server as long as it is uniquely defined based on listening IP, port, and allowed remote IP addresses/ranges.
Note: I don’t have the technet article backing my uniqueness constraint statement but this has been true since Exchange 2007. The receive connector uniqueness requirements on a single server are pretty simple, you can have as many of the connectors as you like as long as one of these three items is completely different than the existing receive connectors on the server:
- listening IP address
- Port binding
- Allowed Remote IP address range
There is another service which goes simply by the name ‘Transport’ or, if you are defining a new receive connector it is the connector type of ‘Hub Transport’. This is the transport service which actually has queues, categorization and routing agents. This service is what allows for re-delivery of mail when the destination server cannot be reached. Generically speaking the Frontend Transport delivers to the Hub Transport for inbound email. And A special setting on the organization send connectors allows the reverse to be true. This setting is not enabled by default and is the ‘proxy through client access server’ checkbox.
A handful of default receive connectors are created on an Exchange 2013 server which are both Frontend and Hub transports. These default connectors generally match up by name and have a one to one relationship where each frontend transport connector has an equivalent hub transport connector. These connectors may also all be on a single server (multi-role).
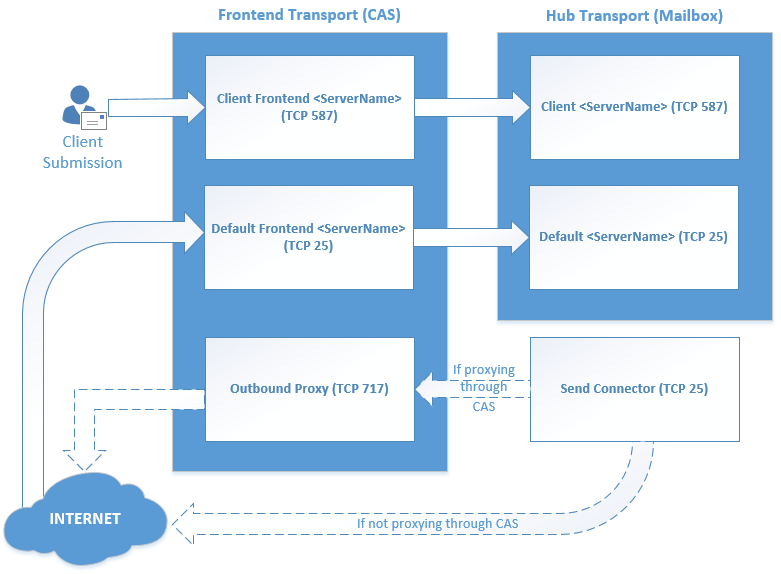
Here is a diagram depicting the default connector relationships in an Exchange 2013 environment in a manner which I find easy to digest. Notice that the send connector has no corresponding frontend transport connector unless proxying outbound email is selected. Then it will use the outbound proxy connector (but it is still a hub transport based transport connector!).
I’m vastly oversimplifying this process but the Frontend Transport will try to find and deliver to the closest healthy Hub Transport service on a mailbox server wherever it might reside. Inbound email from Frontend Transport delivers to the queuing transport services which are called ‘Hub Transport’ for further processing or routing. Then if the email is unable to reach its final destination in the organization it will start to queue up for redeliver attempts.
Note: I’m purposefully skipping over a third transport type known as the mailbox transport service as you cannot create a receive connector of this type. Technically the mailbox transport service is where inbound email is handed off to just before being delivered (among other things).
Ok, so now we know that the frontend transport service always delivers to a hub transport service before actually attempting to deliver email in or out of the organization. So should we simply create our email relay as a hub transport receive connector and skip the middle man? Unfortunately the answer isn’t that easy.
Whereas you can create multiple frontend transport receive connectors on port 25 (with uniqueness constraints already discussed) without service disruption the same cannot be said for hub transport receive connectors. There have been numerous reports of admins breaking mail delivery in their organizations by inadvertently creating new receive connectors as type hub transport. Apparently hub transport connectors trip up over one another when created on the same port, regardless if they are following uniqueness constraints. To get around this you can do one of three things;
- Create a hub transport receive connector for email relay using a different port. This seems to allow multiple hub transport receive connectors to live happily together.
- Setup another relay service outside of Exchange for internal relay. Some organizations opt to use IIS which contain a rudimentary SMTP service which will queue up emails as individual files. This has the benefit of also being a stepping stone towards an all office 365 deployment (you still need something to relay your internal email to the cloud were you to get rid of your internal exchange servers after all).
- Just use frontend receive connectors like you should probably be doing anyway. Make certain that you create them with a narrow allowed IP range (ideally just individual IPs) and you should be golden.
Receive Connectors are Per-Server
An obvious fact to many Exchange professionals is that receive connectors are always configured on a per-server basis. I was debating on if I should even add this section as it feels like common knowledge but it doesn’t hurt to cement this fact in your memory banks. Microsoft describes this succinctly:
Conversely, send connectors are an organization wide configuration. This is why you can expect to see receive connector settings beneath the server configuration area and the send connectors in the organizational configuration area in an Exchange 2010 admin console (In 2013 they are both more aptly within the ‘Mail Flow’ area).
The Issue
The only issue I’ve seen that is directly related to this is when a receive connector is created or modified within a multiple transport server organization. It can be easy to let things get out of sync and end up in a scenario where a single CAS server goes down and suddenly an essential application that needs to relay emails either internally or elsewhere cannot do so.
Here is a pretty simple code snippet to validate the most commonly changed item in a relay receive connector, the RemoteIPRanges which are covered in much further detail in part two of this article.
I probably could have made the above snippet a one liner but this is far easier to read. Simply change out your receive connector names in the first two variables and paste it into an Exchange console and a list of IP ranges which differ between the two connectors will be displayed (along with the server that the range exists on).
Authentication and Rights
If you are attempting to setup an anonymous relay receive connector there are plenty of great articles out there that go over the process. There are a few components to consider for anonymous relay configuration which aren’t always made very clear though. These components fall into two categories, authentication and rights.
Authentication
When you setup a receive connector you must ensure that the authentication mechanism is appropriate to your needs. Setting up authentication consists of selecting an authentication method and some predefined groups to enable it for. A list of authentication mechanisms and their definition can be found at the technet site. Most of the authentication methods are self explanatory.
Note: ExternalAuthoritative authentication may justify a bit more explanation as many admins will use it when defining the most common type of receive connector they might want to create, an internal relay.
As per Microsoft, this authentication mechanism will allow you to send anonymous sender email addresses. You need to ensure that the ‘Exchange Servers’ and Anonymous Users’ groups are selected for the permissions groups on your receive connector in order to get that extended right of ms-Exch-SMTP-Accept-Any-Sender for the NT AUTHORITY\ANONYMOUS LOGON user (see the next section for more information on rights).
Beware though, using this right on a receive connector will allow any email sent through it to resolve to address list users in Outlook. So, if you wanted to spoof an email from the CEO internally and really make it look legitimate this is the connector you would want to use.
Rights
The ability to anonymously connect to a server and attempt to deliver email to the server is not the same as connecting to it and attempting to relay email through the server. For a receive connector to allow access to relay an email the sending party must first be granted the rights to do so. Here are two rights you may find associated with anonymous relay receive connectors:
Ms-Exch-SMTP-Accept-Any-Recipient – This is what will actually allow you to relay email outside of your organization.
You can add the Ms-Exch-SMTP-Accept-Any-Recipient extended right with powershell to enable the relay capability:
Ms-Exch-SMTP-Accept-Any-Sender – This right bypasses all checks done when email is received that validates that it is received by email within the organization. This could also be called the ‘Allow email spoofing’ right I suppose.
Ms-Exch-Bypass-Anti-Spam – This right does exactly what it sounds like it does, bypasses anti-spam for email received. It is often overlooked in other articles and many may think that it only matters for those who are deploying edge services or forefront anti-spam locally. This particular right also bypasses sender filters which may otherwise prevent delivery of email from non-standard email domains (like user@servername).
Here is an obnoxiously long one-liner to report on the receive connectors with the above rights assigned to the anonymous logon users:
This concludes the first part of this article. In part two of this series we will build on the topics we have covered and find out how improperly configured connectors can cause mail flow issues, security holes, and migration coexistence mishaps. I’ll also provide a script to help detect these issues! (Update: Part 2 of this article has been posted)