
Hugo - A DevOps Approach
I’ve updated my site to use hugo some time ago. Recently I’ve found some time to add a deployment pipeline for this site as well. This short article will cover how the pipeline code works and dive into multi-stage pipelines.
Introduction
As I work in the industry I sometimes forget to update the world on what I’m doing. It has been almost a full year since I last posted anything to so it was long past time to get more content out there. Problem was, I forgot how to even deploy to my own site after such a long duration. This time I figured I’d just setup a proper pipeline to get things going again.
Here is the stack I’ve landed with for this website:
- Static Site Generator: Hugo
- DNS Hosting: Cloudflare.com
- CDN: Cloudflare.com
- DNS Registrar: Namecheap.com
- Git Hosting: Github.com
- Web Content Hosting #1: Github Pages
- Web Content Hosting #2: Render.com
- Pipeline Platform: Azure Devops
The only cost in all of this is the custom domain name and some time.
The Process (TLDR)
End to end, the process for this looks a bit like this:
- Purchase your custom domain name (namecheap.com) NOTE: this is the only cost for this entire setup and is not strictly required
- Optionally, transfer the domain name to Cloudflare.com (they are not actually a registrar you can buy domains from but you can transfer to them as a hosting registrar once you own one it seems)
- Create new private repo in github for authoring content. (ie. yoursite.com)
- Optionally, setup a github ssh key to make your life easier.
- Create a new public repo in github for publishing your production site (ie. yoursite.com-content).
- Create a new public repo in github for publishing draft/development content (ie. dev.yoursite.com-content)
- Create a new public repo in github to host your Azure Devops (ADO) pipeline template code
- You may be able to reference my repo but that may not be wise as I may update things at anytime.
- Download hugo binary
- Create new hugo site
- Initialize local git repo in the generated site folder
- Add submodule for some hugo theme to the hugo site
- Add content from 10+ years of blogging…
- Push repo to github authoring site as the upstream source
- Add a ‘develop’ branch for the dev version of your site
- Push up your develop branch
- Create personal azure devops account (dev.azure.com)
- Create a service connector to github and authorize access to all your repos
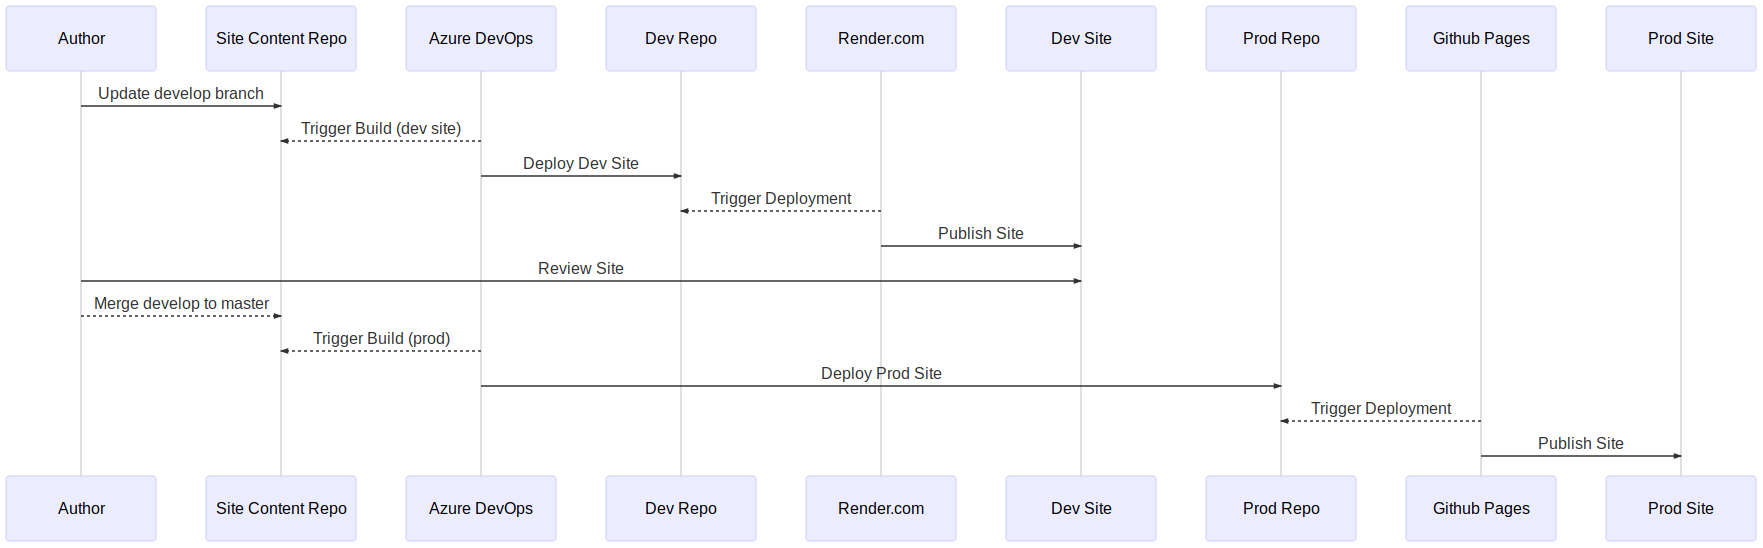
This will set the stage for you to add content to your site in a development environment for review, then approve for release. The workflow for this will be a bit like the following sequence diagram when complete.
To make any of this work we need a few pipelines in ADO. One to create our hugo site content as an artifact and another to shove the deployment content into our repositories. We will use Azure Devops multi-stage pipelines and templates to get this in place.
The Hugo Site
First setup your hugo website. I’m not going to rehash what is already well documented at the Hugo site LINK. You will basically get the binary, run a hugo new command, initialize it as a git repo, and then add a theme as a git submodule. If you are desperate for a site to start with I suppose you could clone my slide deck site LINK. It includes a nice makefile, render.yaml, and azure-pipeline.yml you can modify to suit your needs. But you really should spend a few cycles to just make your own site so you can get familiar with the site layout and some of the methodology behind how Hugo works.
On Git Submodules: I personally avoid git submodules. Submodules tend to obfuscate a git repo’s scope and complexity. Few developers I’ve worked with know to check for them or how to update them. They are also far more difficult to remove than I believe they should be. But in this case it DOES make working with upstream themes much easier.
The Pipeline
I’ve found that the best way to start working on a new pipeline is to declaratively layout the required manifest. Even if it is pseudocode, throw together some YAML declaring what you would like the finished state to look like. Once you have this, adding the template components is pretty easy.
On Authoring Pipelines: If you start with the imperative code first (which I have done before), you may as well just throw it all into a Makefile and then pluck out the parts you need for your pipeline pieces later. But I promise you will be doing more work this way than you might otherwise need to do. If you do your devops work with an end state in mind in a declarative manifest, everything else will fall into place, I promise.
My current site azure-pipeline.yml code looks very similar to what I initially put down for my first draft.
name: $(BuildDefinitionName).$(DayOfYear)$(Rev:.r)
trigger:
  batch: true
  branches:
    include:
    - master
    - develop

# Don't trigger on PRs
pr: none

resources:
  repositories:
  - repository: pipelines
    type: github
    endpoint: github_services
    name: zloeber/azure-pipeline-library

stages:
## Build Hugo site (DEV)
- ${{ if eq(variables['Build.SourceBranch'], 'refs/heads/develop') }}:
  - template: build/hugo-generate.yml@pipelines
    parameters:
      initialize: true
      baseurl: 'https://zacharyloeber-dev.onrender.com/'
      testhtml: 'false'
      staticpath: './docs'
      contentpath: './sites/zacharyloeber.com'
      drafts: 'true'
  - template: deploy/git-folder.yml@pipelines
    parameters:
      repo: 'https://github.com/zloeber/dev.zacharyloeber.com-content.git'
      branch: 'master'
      path: 'docs'
      environment: 'dev'

## Build Hugo site (PROD)
- ${{ if eq(variables['Build.SourceBranch'], 'refs/heads/master') }}:
  - template: build/hugo-generate.yml@pipelines
    parameters:
      initialize: true
      site: 'zacharyloeber.com'
      baseurl: 'https://zacharyloeber.com/'
      staticpath: 'docs'
      contentpath: 'sites/zacharyloeber.com'
      testhtml: 'false'
  - template: deploy/git-folder.yml@pipelines
    parameters:
      repo: 'https://github.com/zloeber/zacharyloeber.com-content.git'
      branch: 'master'
      path: 'docs'
      environment: 'production'
You will notice that I have stages run only for specific branches and that each branch deployment code points to a different github repository. This is one way to manage this process and works well enough for me. It can be used to integrate well with a variety of git branching models but you lose a bit of visibility when entire stages are skipped over within the pipeline GUI.
The Code
Using the deployment above we can infer that a build and a release template will be required. So I created them and put them in their own repo for future site usage [LINK].
I found it best to break down my templates based on build and deploy first, then go further into jobs or steps as I progress. [Here] is the hugo build pipeline.
This builds the site according to your site config.toml file which should include most of your settings. I also allow for different content and output paths.
And the deployment stage takes the packaged artifact (tar.gz file) and extracts it into a specificed git repo folder of your choosing. This assumes the repo is in github as well and that your created service endpoint for it has access. The release pipeline WILL clear out and overwrite anything in that folder then force pull the changes.
In our case, we shove the output of hugo into a repo’s docs folder to make it easier to publish via github pages later (a manual config setting on the repo btw). The release pipeline is pretty simple and also defines an environment which also allows you to setup some gating around final releases if you so desire (bleeding edge ADO manual setting currently).
The hardest part of all of this was figuring out how to pass the service connection authentication through to the deployment stage. We force another checkout of the current repo to ensure that the proper authentication headers are in place (which we then strip out for our own use). Otherwise you can also use a PAT and maunually add in a username/password via environment variables in the pipeline. I opted not to do that to ease manual efforts a little.
Oh, I also broke down a few other steps for repeat use. This includes htmltest and hugo binary installs well as the htmltest run itself. This was largely to make things a bit more clean and composable. But honestly, it was more to have additional lego pieces in my arsenal for future pipelines :) You can find them in the pipeline repository referenced earlier.
Gluing It Together
In Azure Devops, select your profile and go to preview features to enable the multi-stage pipelines view as that is what we will be using. We need to create a service connection in Azure Devops with access to the github repositories as well. I like to call this ‘github_services’ . This will be used for all aspects of the pipeline deployment so ensure it has access to all the repos involved (or just give it full access if you do not care so much). There are no secrets or environment variables added to the deployment other than this connector.
We will have to setup your domain forwarding for custom domains to render.com or github based on how you choose to host your site. I use both for my blog because I’m a dork. For my slideshow hugo site I just use render.com (but use the same pipeline code across both)
When your site structure is ready you are ready to publish some content.
Publish The Test Site
To create and publish a draft post just ensure you are on the develop branch, create a post, then push it up to develop. Let the pipeline do its thing and review your dev site.
git checkout develop
make new/post some_awesome_content.md
hugo new content/posts/new_blog_post.md
git add --all . && git commit -m 'post: some awesome content added'
git push origin develop
Assuming you have a similar pipeline setup as I have for this site in ADO, you will have a new site generated at your development repo in github. You then need only link up the render.com site to github and the repo you just updated and your site will ‘render’ pretty quickly thereafter.
Git Merge to Production
To promote your draft to production simply merge to master and push your changes to github.
git checkout master
git merge develop
git add --all . && git commit -m 'post: some awesome content approved to publish'
This will publish to ./docs of your deployment repo.
On Static Site Hosting: For my blog I use github pages along with cloudflare so I can get some nice stats around visitors and, simply put, I’ve come to respect cloudflare from personally working with them in the past. If you use Github Pages, you will have to update the deployment repo configuration settings to include the ./docs deployment path and setup the pages hosting. My pipeline automatically creates the CNAME entry in your release artifact that is needed for this to work properly with alternate domain names as well.
Final Thoughts
The entire process for pipelining a Hugo static site is certainly a fun little side project. Static site generators are extremely DevOps friendly. I highly recommend anyone looking for more devops acumen give it a shot for their own site. You will hone or even learn foundational devops knowledge in several areas including:
- Version Control (git)
- Branch management
- CI/CD
- Pipelines
- Cloud integrations
- DNS
- Webhooks/Triggers
I don’t know if I should be proud or depressed that over 10 years of original site content can be compiled into a static site in under a minute. An entire pipeline deployment is not quite necessary for a simple static site for a personal blog. Render.com will build and host it for you in a jiffy without much of this packaging and pipelining of code (there is even render.yml declarative manifest files you can drop in your repo to automate that process as well). But the moment you are not the sole contributor to a project things become easier to manage with pipelines that clearly divide CI and CD with immutable artifacts inbetween.
And that’s about all I have for this post. Only one real post in this year but I promise I’ve got more to come as I round back on all I’ve learned in my deep diving into the world or kubernetes, devops, and infrastructure as code in the last few years.